
UGH! It has been farrrr too long since my last post. Weirdly enough, I miss it! I’ve been doing a ton of stuff that I want to post about, but it is mostly gifts for other people or planning for my sister’s bridal shower. Obviously, I haven’t been able to post any of that stuff. I will soon, so get excited. Until then…
A few years back my mom and I started making quilts whenever we got invited to a baby shower of a close friend or family member. It is a great tradition, but also a ton of work. We recently went to a shower of a close family friend who decided not find out the sex of the baby. This really narrows down the options for quilts, so I was hunting around for a baby quilt that would work well. I found this pattern and thought it would be perfect because every square could be a different color! It’s called the Monkey Wrench Baby Quilt (hence the blog title).
My mom and I spent about an hour and a half in JoAnn Fabric’s picking out fabrics that would go well together. We ended up with these… I especially love the brown fabric printed with “baby.”
 The first step was to make half square triangles (in which you make a square that is made up of two triangles of two different fabrics). You can find the directions to make HSTs here. First draw a diagonal line on the lighter square. Sew a quarter inch on either side of the line.
 Cut on the line to make two triangles. Trim the corners so they won’t show when the square is ironed.

 Iron the squares flat. They’ll look like this.
 Then sew the strips together.
 Cut strips into 2.5 inch squares. Cut 20 squares of brown fabric for the middle of the blocks. Then you’re ready to piece the blocks together!
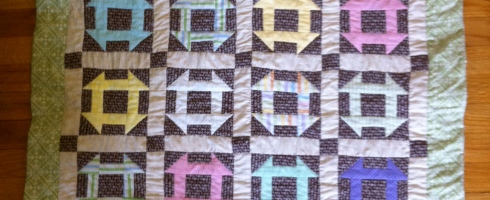
 When all the blocks are made, lay them out to figure out what blocks look best near each other. I used ten different fabrics for the blocks, so I wanted to make sure that none of the colors were near their partners. (This picture is laid out on a bed, so ignore the comforter pattern.)
 Sew in the connecting strips and border. Pin and quilt. Bind the quilt by hand or using a binding strip.

I absolutely love how this quilt turned out! It will be perfect for a boy or a girl, and I am so happy that I could give something that I made myself (with some help from my mom). Can’t wait to start the next one!
-Carolyn
